The Apple Pencil’s compatibility with the iPad is a major selling point for creators, making it the best iPad stylus. However, setting up your iPad with an Apple Pencil isn’t always as simple as plug and play. Users need to know how to connect Apple Pencil to iPad.
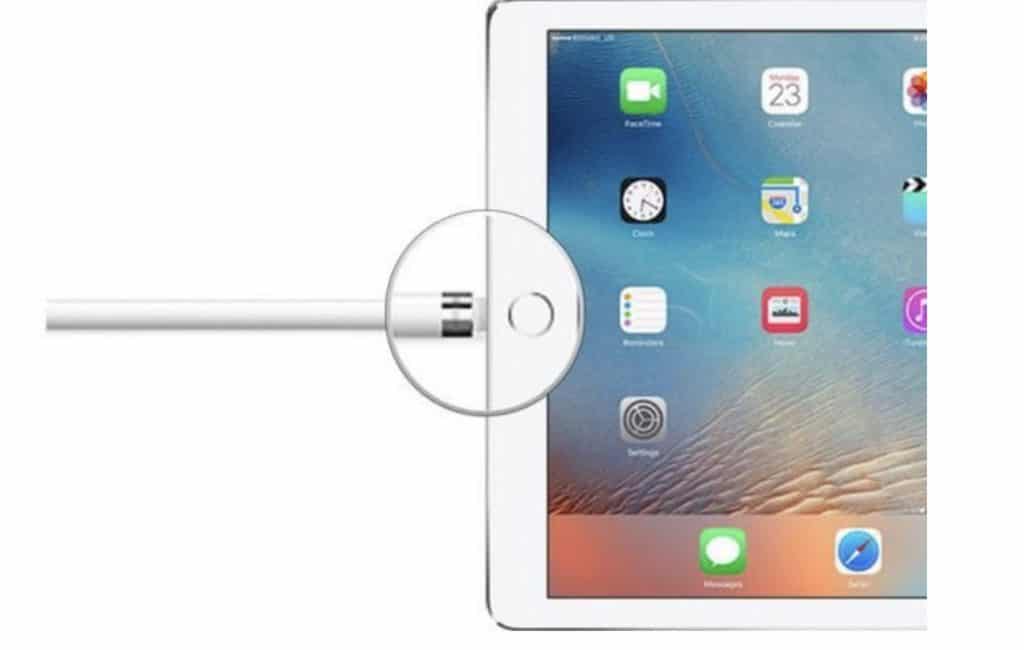
The steps on how to connect Apple Pencil to iPad are pretty simple. First, you need to remove the cap and plug your Apple Pencil into the Lightning connector on your iPad. When you see the Pair button, tap it. Apple Pencil’s pairing remains consistent until you reboot your iPad, switch to Airplane Mode, or switch to a different iPad.
There are several ways to connect your Apple Pencil to your iPad. This guide will walk you through all the methods.
How to Connect Apple Pencil to iPad
Apple Pencil’s compatibility depends on the iPad model you own. The first-generation Apple Pencil, Apple Pencil, is compatible with older iPads without flat-edge design. The second-generation Apple Pencil or Apple Pencil 2 is compatible with iPad Pro or iPad Air 4 2018 and later models.
The first-gen Apple Pencil connects to the iPad using a Lightning Adapter. The second-generation Apple Pencil uses magnets on the iPad’s top to hold it in place on the side. To learn how to connect Apple Pencil to iPad, follow the steps below.
How to connect Apple Pencil (1st generation) with your iPad
- To connect your Apple Pencil (1st generation) to the compatible iPad, remove the cap from the rear of the Apple Pencil and plug it into the iPad.
- Now, you will see a Bluetooth-pairing request pop-up on the screen. Tap the Pair option.
- After successful pairing, your Apple Pencil is connected to the iPad.

How to connect Apple Pencil (2nd generation) with your iPad
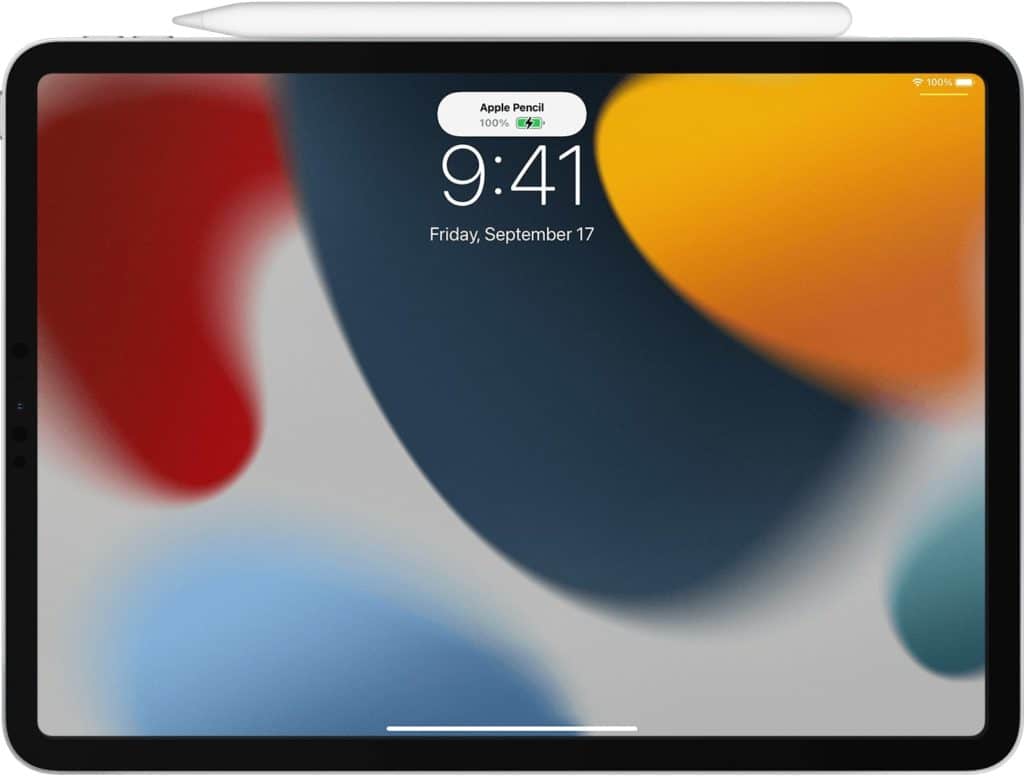
- To connect your Apple Pencil (2nd generation) to the compatible iPad, attach the stylus to the side of your iPad using the magnetic connector. Just hold the Apple Pencil to the side of the iPad, and it will latch to the magnet by itself.
- You will get a Bluetooth-pairing request pop-up on the screen. Tap the Pair option, and your Apple Pencil is now connected with your Apple iPad.
How to Set Up Apple Pencil
After pairing your Apple Pencil 1st gen or 2nd gen with your iPad, you need to set it up. Follow the instructions below to set up your Apple Pencil:
- Go to your iPad Settings and tap on the Apple Pencil option on the left side panel.
- Tap the Only Draw with the Apple Pencil option, enabling you to limit your Apple Pencil to drawing purposes only and not navigating the iPad.
- Tap the Scribble option and enable it if you want to convert your scribbled text to typed text automatically.
- If you want to take screenshots with Apple Pencil, enable the Left Corner Swipe. If you want to open the Quick Note app automatically when using the Apple Pencil, enable Right Corner Swipe.
- Your Apple Pencil 2 is now all set to be used with your iPad. You can always go back and tweak the settings as per your desire.
Is Your Apple Pencil Compatible with your iPad
The compatibility aspect is essential to know when buying an Apple Pencil. Below is the chart to list compatible iPad for Apple Pencil 1st-gen and Apple Pencil 2nd-gen.
| Apple Pencil 1st Generation | Apple Pencil 2nd Generation |
|---|---|
| Apple iPad (9th gen) | iPad Air (4th gen) |
| Apple iPad (8th gen) | iPad mini (6th gen) |
| Apple iPad mini (5th gen) | iPad Pro 12.9-inch (3rd gen) |
| Apple iPad (7th gen) | iPad Pro 12.9-inch (4th gen) |
| Apple iPad (6th gen) | iPad Pro 12.9-inch (5th gen) |
| Apple iPad Air (3rd gen) | iPad Pro 11-inch (1st gen) |
| Apple iPad Pro 12.9-inch (1st or 2nd gen) | iPad Pro 11-inch (2nd gen) |
| Apple iPad Pro 10.5-inch | iPad Pro 11-inch (3rd gen) |
| Apple iPad Pro 9.7-inch |
How to Connect Apple Pencil to iPad: Troubleshooting
Here we cover some of the troubleshooting methods to overcome Apple Pencil pairing issues with iPad.
Check Connection and Charging Port
If you’re using the Apple Pencil (1st generation), you’ll need to make sure it’s properly plugged into the Lightning port. Dirt and debris accumulating inside the charging port can sometimes cause it to hinder the connection.
Make use of an anti-static brush to clean any debris that may have formed in your iPad’s lightning port. After the cleaning task is finished, try re-pairing the devices.
Check Battery Level
Next, make sure the battery in your Apple Pencil is fully charged before continuing. We know that seems bizarre, but it occurs all the time. Take a look at the Battery section of the Apple Pencil in the Notification Center.
There is a ten-minute delay between when your stylus is fully charged and appears in Notification Center if you haven’t used it in a while. Give your Apple Pencil some time to charge if you don’t see it right away.

The way you check the battery life of your Apple Pencil will differ based on the model.
To check the battery level on the Apple Pencil 1st gen:
- Go to the iPad’s Settings app and tap on General.
- Find and tap the Apple Pencil in the sidebar, and a menu will appear.
- You’ll see the current charge level of the Apple Pencil in the first option.
To check the battery level on the Apple Pencil 2nd gen:
- Attach your Apple Pencil to the side of the iPad using a magnetic connector.
- For a few seconds, a little pop-up will appear, revealing the current charge level of the Pencil.
- If you’d want to see the pop-up again, simply go to Settings of your iPad and tap the Apple Pencil option to see the battery level option.
- In addition to these options, the iPad battery widget may show you how much juice is left in your Apple Pencil.
Charge Apple Pencil
If your Apple Pencil is indeed running low on juice, you need to charge it to ensure successful pairing with the iPad. Follow the instructions below to carry out the process.
How to charge Apple Pencil (1st Generation)
- To access the Apple Pencil’s Lightning connector, remove the rear cap.
- Plug it into the iPad’s Lightning connection the same way you did when connected to the iPad.
- After 10 minutes, you can take your Apple Pencil from the charger. If you need to recharge it again, simply follow the steps above.
Alternatively, you can use a USB power adapter to charge your Apple Pencil (1st generation)
If you don’t want to charge the Apple Pencil with your iPad, you may use the Apple Pencil Charging Adapter to charge it. The Apple Pencil’s charging adaptor is included in the package.
How to charge Apple Pencil (2nd Generation)
- Attach your Apple Pencil to the side of your iPad.
- A little pop-up will appear for a few seconds, indicating that the charging has begun. As long as your Pencil is attached to the side, it will keep charging until you remove it.
That’s the beauty of this arrangement applied by Apple for Apple Pencil 2. It rarely runs out of charge.
Toggle Bluetooth Connection On/Off
Using Bluetooth, your Apple Pencil is connected to your iPad. The two may be unable to pair if there is a problem with connectivity. To resolve the issue, turn off and then turn on your Bluetooth.
To accomplish this, follow these instructions:
- Go to the Settings of your iPad
- Tap the Bluetooth option
- Toggle it OFF and wait for 10 seconds before toggling it ON
Forget Your Apple Pencil as a Bluetooth Device
The information is stored on your iPad when you sync your Apple Pencil with it. The two devices cannot pair if any step in the procedure is altered. To re-establish a connection between your Apple Pencil and your iPad, disconnect the two devices and reconnect them as fresh ones.
Follow these instructions:
- Open the Settings app on your iPad.
- Tap the Bluetooth option.
- Tap the blue “I” symbol on the right-hand side of the screen.
- Now, tap Forget This Device option and confirm the action by tapping the Forget Device option.
- After this drill, try re-pairing the devices from scratch.
Reset Your iPad’s Network Settings
When you reset your iPad’s network settings are returned to their factory defaults. This step may cure a more serious Bluetooth issue your iPad is now dealing with. All of your Bluetooth devices will need to be reconnected, your Wi-Fi passwords will need to be retyped, and VPN will need to be reconfigured.
Go to your iPad Settings and then go to General > Reset > Reset network settings. To confirm your selection, tap Reset Network Settings once again.
Afterward, your iPad will turn off and restart. Try re-pairing your Apple Pencil to your iPad once again.
Reboot iPad
Many software issues can be fixed by restarting your device, including this one. All running apps will be shut down and relaunched when you reboot your iPad. It is possible to restart your iPad in two ways.
The first method is for restarting the iPad with a Home button. Just follow the instructions below:
- Press and hold the Power button.
- Swipe the on-screen slider to the right, and your iPad will shut down.
- Wait for 30 seconds and restart your iPad.
The second method is for restarting an iPad that comes without a Home button. Follow the steps below:
- Press and hold the power button and either of the downward or upward volume button simultaneously until you see the power off slider appearing on the screen.
- Now, drag the slider to the right and wait 30 seconds.
- Power on your device by pressing and holding the power button until you see the Apple logo appearing on the screen.
Contact Apple Support
If none of those above fixes worked, it’s time to get in touch with Apple. In addition to phone, online, and email support, Apple also offers in-person visits. Make an appointment at your local Apple Store if you plan to visit.
Also Read: Find My Apple Pencil: Tips, tricks, and fixes!
Conclusion
There’s nothing more frustrating than getting ready to work with a device only to discover a glitch that prevents you from doing so. We hope this guide helps you quickly fix the issue by directing you on how to connect Apple Pencil to iPad.
The new second-generation Apple Pencil is even easier to use than the previous model for syncing. You can understand the difference between the two in this comprehensive comparison we have put together — Apple Pencil 1 vs 2: What’s the difference?
Tell us about your experience with your particular model of Apple Pencil. Let us know your thoughts in the comments below.


Leave a Reply