If you’re a web developer or simply curious about the code behind an element on a website, inspecting it is now effortless with either Chromebooks or ChromeOS tablets. Users can view the HTML source code with just a few clicks.
If you’re using a Chromebook managed by an establishment such as a school or corporation, it’s likely that the inspect element feature has been blocked for your safety and to prevent reverse engineering or cheating on online exams. Unfortunately, there is no way to unblock this function without requesting permission from the network administrator first.
To know how to inspect on Chromebook without restrictions, keep reading!
How to Inspect on Chromebook
Inspecting element on ChromeOS is pretty easy. Using the Inspect option is the easiest way to inspect element on Chromebook. Follow the steps below to inspect elements on your Chromebook:
- On your Chromebook, open the Google Chrome browser.
- Now, open the webpage that you wish to inspect.
- Hover and right-click on the element you want to inspect, and then select the “Inspect” option from the menu.
- A developer menu will now open with multiple sections, allowing you to inspect thoroughly and find the information that you’re looking for.
Note: You can also just press the key combination Ctrl+Shift+I on your keyboard to open Developer Tools and inspect the element right away on your Chromebook.
What is Inspect Element and What Does It Do?
The popularity of “Inspect” is undeniable, particularly among developers and coders who rely on its convenience. By inspecting web pages, individuals have the power to make changes in order to see what the final product would look like. This allows them to easily experiment with different elements without having any negative repercussions for their website or program.
In short, Inspect provides users with a unique advantage that cannot be replicated by other programs or services, an advantage that should not be underestimated.
Inspect Element is a powerful tool that can unlock the secrets of any webpage. By simply hovering over an HTML tag, you will be able to not only see its corresponding section highlighted in the Inspect section but also identify valuable CSS classes and attributes related to it.
With this feature at your disposal, debugging webpages has never been easier. All you need to do is grab all the information available right in front of you – revealing everything necessary for understanding HTML/CSS code in stunning detail.

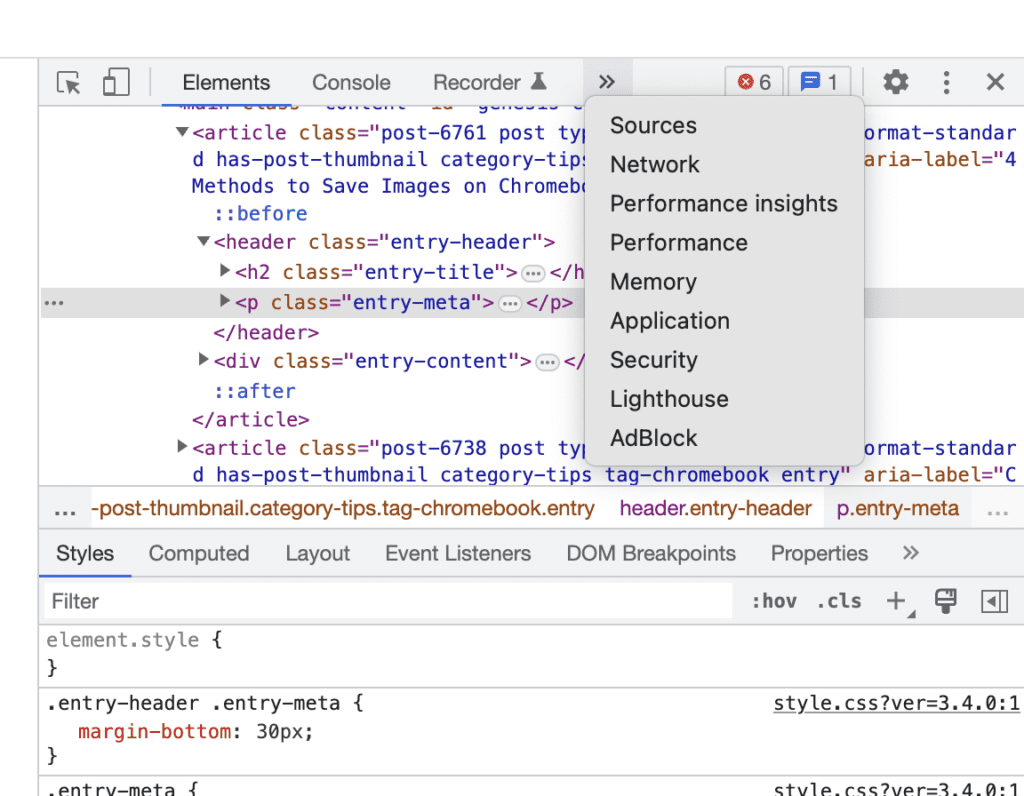
When you launch this tool, it directly opens the “Elements” tab in the developer menu. While there are many other tabs in said developer tools menu, only two of them are most regularly used by users:
- The Console Tab, which displays output and errors for Javascript scripts; developers mainly use this to debug JS.
- The Network Tab, which shows all requests made from your browser to a web server when loading up a webpage — invaluable for understanding what components load into that page and how long each component takes.
All Chromebooks running the Google Chrome browser have “Inspect” built-in, accessible across all websites – regardless of type. This is true not just for Chromebook but also for most internet browsers like Safari, Firefox, and more. So no matter what device you’re using – Inspect is there to help.
Inspecting on a Chromebook
Now that you understand the capabilities of the “Inspect” tool, let’s take a look at different ways to inspect elements on Chromebook.
Inspect Element Using Developer Option
Using the developer tools option is also a nifty way to inspect elements on Chromebook. Follow the steps below to inspect elements on your Chromebook using the developer option:
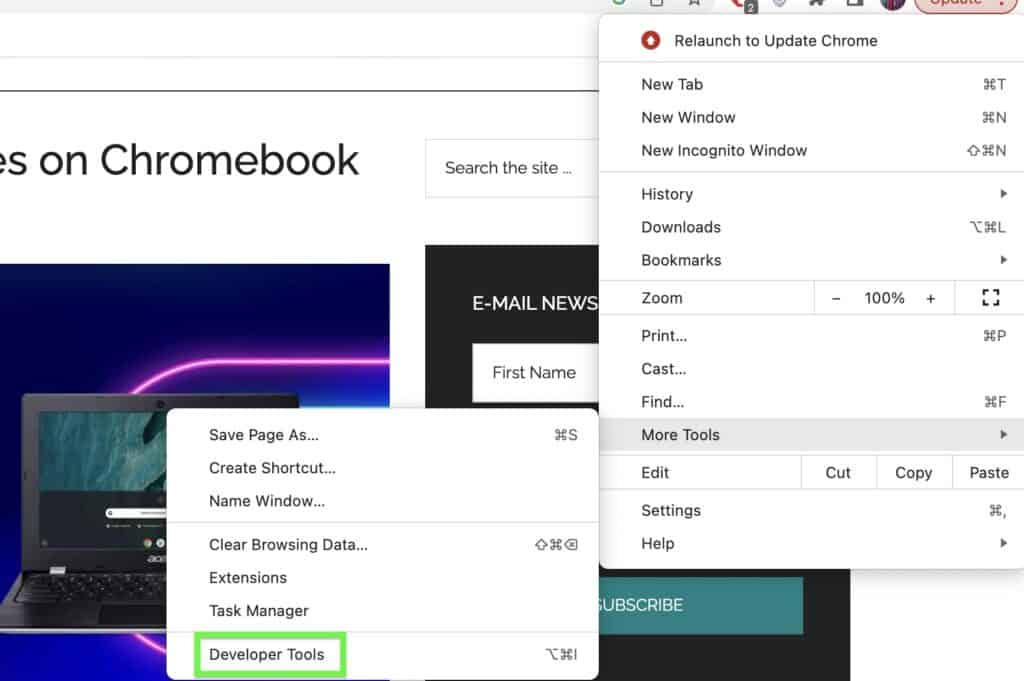
- Open Chrome browser and click on the three dots next to your profile icon.
- Select More Tools, then choose Developer Tools.

- A console will appear on the right side of your webpage containing its code.
- You can activate this with a single click by clicking on the square-shaped mouse icon located in the top left corner — or use Ctrl + Shift + C for shortcut access.
- Now you can investigate deeper into any area of interest within that page by simply hovering over it, and its code will be revealed in detail in the console panel.
Using Keyboard Shortcut
If you’d like to inspect an element on any website with the quickest, easiest method possible — look no further than using keyboard shortcuts for your Chromebook. All you need to do is press Ctrl+Shift+I and the powerful developer tools will open up, allowing you to examine that element in detail.
How to Unblock the Inspect Element Option on Chromebook?
Disabling JavaScript is one way to unblock the inspect element on Chromebook, but it isn’t always an effective solution, especially for school Chromebooks. If you have a personal Chromebook and can’t find the inspect element option, then follow the steps below to disable JavaScript on your device and enable the inspect option.
- To disable JavaScript on Chrome, start by clicking the three-dot icon to access your browser’s Settings.
- Now, look for “Javascript” and select “Site Settings.”
- Find the option for JavaScript and choose “Don’t allow sites to use Javascript” — this will deactivate it from all websites.
- Restart your browser — you should be able to view the Inspect Element option now.
Why can’t I use the Inspect Element on School Chromebook?
Unfortunately, the inspect element feature may be inaccessible to school Chromebooks due to its restriction by the IT department. This is because they believe it should not be used by students and cannot be changed in the control panel of your device.
All Chromebooks at school are managed the same way via a server. On this server, IT administrators can determine which features should be enabled and how each device is configured. If you find that Inspect Element isn’t available on your Chromebook while at school, it’s because the IT department has put it on their list of disallowed functions.
Also Read: How to Unblock Websites on a School Chromebook
Frequently Asked Questions
Now that you know how to inspect element on a Chromebook, let’s dive into some related questions.
Why can’t you inspect on a Chromebook?
Businesses and educational institutions often disable access to certain websites and features on Chromebooks for the purpose of safety; they don’t want you tinkering with their devices. After all, it’s been provided specifically so that you can use it for work-related tasks.
How do you press F11 on a Chromebook?
You can use the F11 feature on a Chromebook, by pressing the Search/Launcher + hyphen(-) keys simultaneously.
How do I run inspect mode in Chrome?
You can run inspect mode in Chrome by clicking the three-dot menu in Chrome browser and then clicking the “Inspect” option to open the console.
You can find the inspect button in Chrome browser in the menu list. Just click the Chrome menu and you’ll find the inspect button at the bottom of the menu.
Conclusion
Inspecting an element on a webpage with ChromeOS is simple and straightforward—that is if your administrator has allowed it. Let us know if you found this guide helpful to your objectives, and leave a comment! The “Inspect” tool is an invaluable asset, and we hope it helps in the future!
To learn more about what your Chromebook can do, read our helpful tutorials, which show you how to change the language on your Chromebook and how to connect a Chromebook to a TV.

Leave a Reply