When you have a Chromebook, zipping and unzipping files is nearly as essential as it is on your other devices. However, if you’re not sure how to do this safely and securely, then sending individual documents or trusting an unreliable third-party app can put your data at risk of malicious software.
Fortunately, with zip and unzip features on Chromebooks, these tasks are simpler than ever before.
Did you know that Chrome OS now has a feature to easily compress and decompress any file? In this guide, we will be walking through how to unzip files on Chromebook. Let’s dive in!
How to Unzip Files on Chromebook
Unzipping file(s) is relatively easy on ChromeOS. Just follow the steps below to unzip files or extract ZIP files on Chromebook.
- On the Files app, navigate to the file you wish to unzip.
- Next, double-click on the zip file located in the left side panel to open the archive and view the contents.
- As the archive opens, select all the files in it and right-click to choose the “Copy” option.
- Now, open the location where you want to save the files and then right-click again and select the “Paste” option.
- Your files will get copied to the new location for you to view and edit.
- After successful extraction, go to the zip folder in the left panel of the Files app, right-click, and choose the “Eject” option.
Unzipping Files on a Chromebook
Chromebooks provide two powerful methods to extract ZIP files — you can take advantage of ChromeOS’ built-in extraction feature or manually duplicate the contents within. We have already explained the manual extraction method above, so let’s get down to the built-in extraction feature available in Chromebooks.
Unzipping Files with ChromeOS Built-in Extraction Feature
The latest versions of Chromebooks running ChromeOS 101 and beyond now have the capability to effortlessly unzip archived/compressed ISO, TAR, and RAR files. Follow the steps below to use the option.
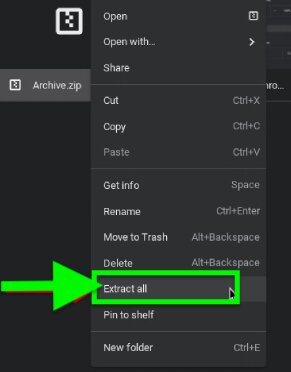
- To extract the content inside these folders, simply right-click on them and select “Extract All” in the pop-up menu that appears.

- ChromeOS will extract the contents of a ZIP file to an aptly named folder – for example, when you unzip a “Pictures.zip” file, your Chromebook automatically creates a corresponding “Pictures” folder with all the items inside.
- However, if this isn’t occurring on your device and you’re unable to locate the ‘Extract all’ option in the right-click context menu of zipped files, then be sure to check whether there’s an update available for your Chromebook.
To ensure your Chromebook is up-to-date, connect it to a wireless network and open Settings. Subsequently, locate About ChromeOS in the sidebar menu and choose Check for updates. Ultimately, click Restart to install any preloaded update on your Chromebook.
Zipping Files on a Chromebook
With ChromeOS’ file manager, you can effortlessly compress different kinds of files (photos, audio recordings, videos, and more) into a neat ZIP file. Follow the steps below to easily ZIP files on your Chromebook.
- If you want to ZIP your desired files, then open the Files app by pressing Shift + Alt + M and navigate to the folder where these documents are stored.
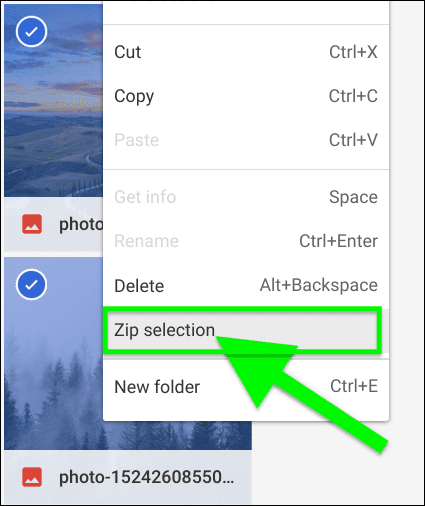
- Right-click the desired selection and select “Zip Selection.”

- ChromeOS will automatically create a ZIP with the same name as your original document.
- If you’d like to bundle multiple files into one convenient package, just hold down Ctrl while selecting each item.
- Then, click on the chosen items and click “Zip selection” once more; this time generating an Archive.zip file for easy storage.
- To change its title from default settings to something of your choosing quickly, simply highlight it using CTRL + Enter instead.
Generating a ZIP file from zipping your folder is simple and effective – the title of the resulting file will match that of the compressed folder. For example, if you zip a “Screenshots” directory you’ll have “Screenshots.zip” as its output.
Here’s a nifty video guide to zipping and unzipping files on a Chromebook:
Frequently Asked Questions
Now that you know how to zip and unzip files on Chromebook, let’s answer some related questions too.
Is there a free unzip program for Chromebook?
ZIP Extractor is a free app available for Chromebook which also supports a variety of other formats such as RAR, 7z, and TAR – even those that are password-protected.
Does Chrome automatically unzip files?
No, Chrome does not unzip files automatically, but there are plenty of browser extensions available that can give you this functionality.
Can you run ZIP files on Chromebook?
Like Windows, macOS and Linux systems, the Chrome operating system offers users a convenient way of zipping and unzipping their files. It has a built-in extractor feature for unzipping files too.
Why am I unable to unzip a file on Chromebook recovery?
To be sure you don’t experience the dreaded “unable to unzip file” error, make certain your Chromebook has a minimum of 8GB capacity; 16GB is encouraged for optimal performance. Additionally, your SD card or USB drive must have a bare minimum of 4 GB in available space if attempting this task.
Conclusion
Chrome OS has certainly achieved its goal of making life easier for users—you don’t need to bother with installing ZIP and RAR programs, just right-click and get down to business. Hopefully, our guide has helped you zip/unzip files like a pro with your Chromebook. Did our instructions help? Let us know how it went in the comments below!

Leave a Reply