We’re big fans of Chromebooks, even though this amazing Google product does not get as much love as its Windows and Apple counterparts (Surface tablets and iPads, respectively). A Chromebook with decent specs can easily be your main work machine, as it can do everything a typical laptop can — surf the web, connect to an external monitor, store files locally, connect to printers and TVs, etc. It even goes beyond the call of duty by running both Windows and Android apps!
But we’re here to address a specific question: how to eject a flash drive from Chromebook? If you’re used to the Windows method of disconnecting USB connections from the taskbar itself, you may struggle to do the same on a Chromebook. That’s where we come in! Keep reading to learn all about how to eject USB from Chromebook.
How to Eject USB From Chromebook
The process to eject USB from Chromebook is slightly different from that of a Windows computer. The eject button is not located on your Chromebook taskbar but is instead part of the Files app. So if you wish to remove your USB stick, you must first eject it from the Files app. To do so, open the app, locate the USB drive on the left pane, and click the eject button next to it.
That’s it! It’s now safe to remove your USB from the Chromebook.
Why You Must Eject a USB Flash Drive Correctly

If you eject a USB drive improperly or just unplug it from your computer without safely ejecting it, it can potentially cause several problems, including:
- Data loss or corruption: If you unplug a USB drive while it’s still actively being written to or read from, you could lose data or corrupt files that are open on the drive. This can cause the files to become unreadable or unusable.
- File system damage: Though uncommon, abruptly unplugging a USB drive can cause damage to the file system, which can result in errors or disk failures. The file system is responsible for managing the organization and storage of files on the drive, so any damage to it can have serious consequences.
- USB drive damage: Improperly ejecting a USB drive can also physically damage the drive, especially if it’s done repeatedly over time. It can cause wear and tear on the USB port and the connectors on the drive, potentially leading to hardware failure (and those always happen when you least want them to!).
- Data security risks: If you don’t eject a USB drive properly, it can also pose a security risk if the data on the drive contains sensitive or confidential information. Anyone who has access to the computer after you unplug the drive may be able to access the data that was left open or cached in the drive’s memory.
Therefore, it’s essential to always eject a USB drive properly by using the “eject” button from your Files app before physically unplugging it from your computer.
Ejecting a USB From Chromebook
To eject a USB from a Chromebook, follow these instructions:
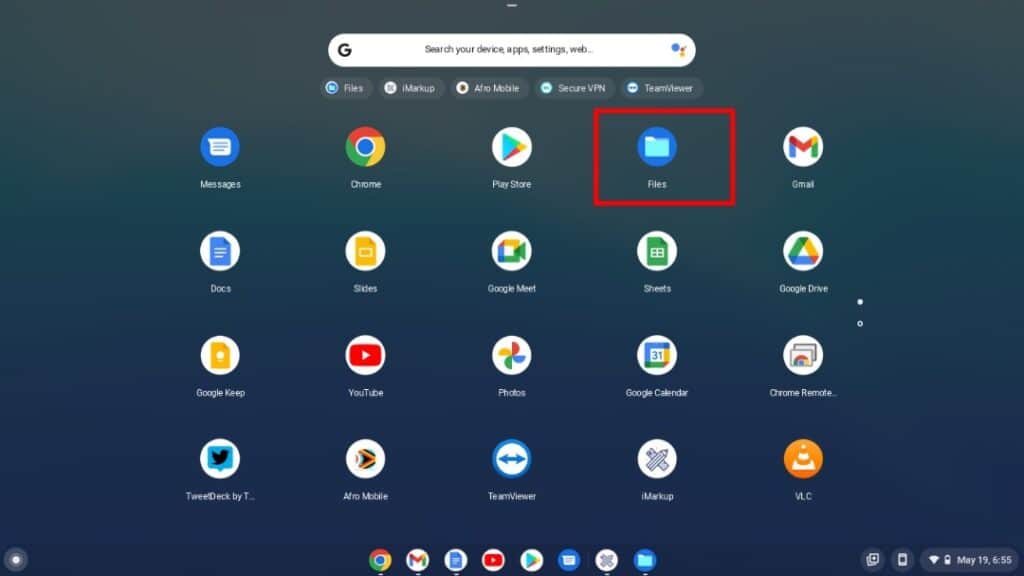
- Pull up the Files app on your Chromebook (to see all your apps, tap the launcher on the taskbar at the bottom of the screen) and click to open it.

- You should see your USB drive listed under the “Devices” section in the left-side menu. Click on it once to open it.
- Once you’ve opened your USB drive, you should see all its files and folders.
- To safely eject the USB, click on the “eject” icon next to the USB drive’s name.
- Wait for a moment until you see a notification confirming that it is safe to remove the USB device.
After you have successfully ejected your USB drive, you can safely unplug it from your Chromebook.
Here’s a YouTube video to help you with this:
Can’t Eject USB from Chromebook?
Unable to eject your USB from your Chromebook? Let’s look at some reasons why this may be happening.
- File transfer is in progress: If you have recently transferred files to or from the USB drive, it may be in use and cannot be ejected until the transfer is complete. Wait for the transfer to finish, and then try to eject the USB drive again. Check if any copy functions are currently running in the background.
- An app is still accessing the USB drive: If you have an app that is still reading/writing files on the USB drive, your Chromebook won’t let you eject the drive. Ensure that all applications are closed (by going into the Task Manager — you can open this by pressing Search + Esc), and then try to eject it.
- The USB drive is damaged: If the USB stick is damaged or has errors, it may not eject correctly.
- Chromebook system error: In some rare cases, there may be a system error preventing the USB drive from being ejected. In this case, try restarting your Chromebook and then eject the USB drive again.
- User permissions: If you do not have the appropriate permissions to eject the USB drive, you may not be able to do so. So if you’re trying this on a work or school Chromebook, ask the system administrator for help.
Frequently Asked Questions
Your Chromebook does have an eject button, but it cannot be found on the taskbar. To find the eject button, fire up your Files app, and on the left side, click the eject button next to the USB/flash drive. Once you see the notification telling you it’s safe to unplug your USB, go ahead and do so.
What happens if you remove a USB without ejecting?
It’s pretty risky to remove a USB stick or drive without ejecting it first. If any disk read/write operations are running when you unplug the drive, it can cause all the data on the disk to get corrupted. It can also cause your system to crash on rare occasions.
How do I unmount and eject a USB?
In the Files app on your Chromebook, look for the USB drive on the left pane. You should see an eject button next to the name. Tap it, wait for your Chromebook to confirm that it’s safe to unplug your USB drive, and then disconnect it from your Chromebook.
Conclusion
We hope this article showed you how to eject USB from Chromebook and what the negative effects of not doing it correctly are. It’s best to follow protocol to avoid errors with your USB stick or on your Chromebook, which is why we wrote a guide on how to eject flash drive from Chromebook! If you have any questions, feel free to leave them below!

Leave a Reply