

Most of our computing devices typically manage time-keeping by themselves, as long as they’re connected to the internet. Our smartphones and tablets connect to servers that give them accurate time information, down to the second. But what do you do when you find that the time or date on your iPad is completely off — do you know how to change time on iPad? That’s what we’re here for (not to change the time on your iPad, but to tell you how to do it!). Read on!
Here’s how to adjust the time on iPad — all you have to do is navigate to Settings > General > Date and Time. Here you will see “Set Automatically” toggled on. When you tap the toggle switch, you will then see an option to manually set the time. Simply tap on the time to see the scroll wheel that adjusts it. You can also tap the time zone if you want to change your city. So if you were wondering how to change time on iPad, that’s how it’s done!
How to Change Time on iPad
It’s a helpful hack to know how to adjust the time on iPad (or you could bookmark this article!) because there are a few situations where it can come in handy. As we mentioned before, the iPad typically connects to Apple’s servers, where it receives precise information about the exact time based on your location, and it reflects on your tablet.
But what if you’re traveling? You may find that your iPad’s clock is displaying the wrong time when you’re in a new city. Instead of waiting until you can connect to the internet and allow the system to update, you could manually update it yourself and continue to work. It’s also possible that the process gets a bit buggy, and the clock is entirely wrong, in which case, adjusting it yourself would be the best option.
Another situation where you may want to manually force the clock to display a different time is if you’re flying to a distant place, and wish to have your iPad synced to that city’s time zone. You may need it if you’re adding timestamps to your work files or making a presentation with time-specific data in it.
By the way, if you’re not using your iPad for work and have a laptop instead, we wrote an article comparing tablets to laptops, you should check it out!
There are a few ways you can manually set the time on your iPad — you can either put in specific details of the hour and minute or simply choose the time zone and let the time and date auto-load. Here are both the methods explained.
- First, turn on your iPad and open the Settings app.
- Inside Settings, navigate to General > Date & Time.
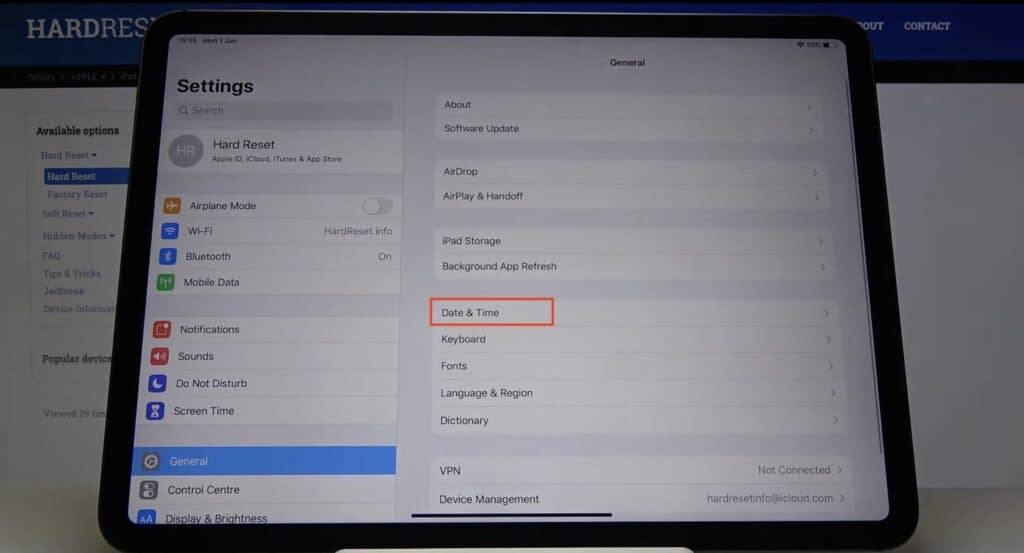
- Here you will see a few options — a toggle switch for 24-hour time (which makes your clock display time in the 24-hour format), an option that says “Set Automatically” (with its toggle turned on), and a third option is, the time zone, which is grayed out and cannot be clicked. Besides this, you also have toggle switches to display the date on your status bar and the option to show AM/PM on the same status bar.
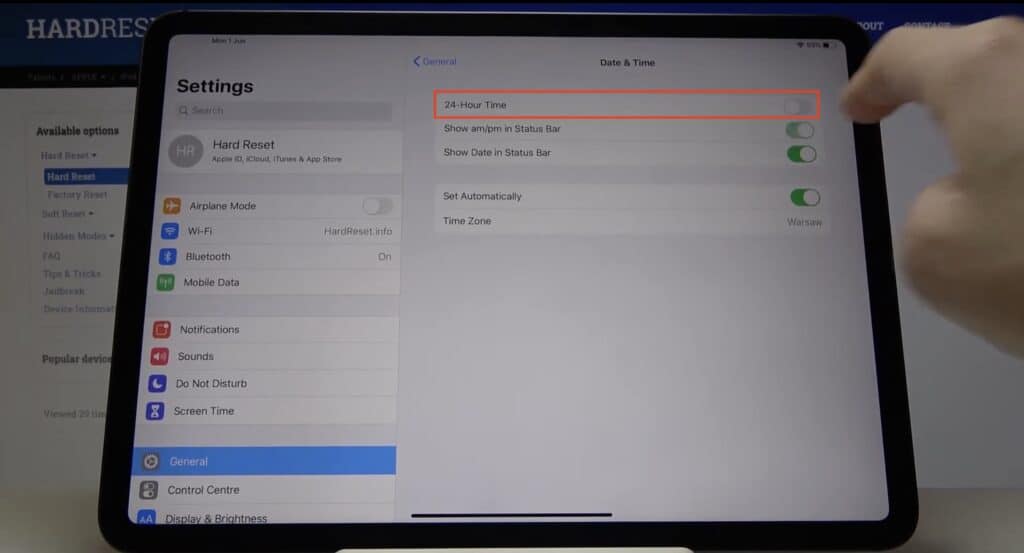
- Let’s focus on the Set Automatically option — this tells your iPad to connect to the internet for the latest time data and synchronize.
- Once you hit the toggle switch to turn it off, you should see the date and time appear below in blue.
- These are adjustable parameters, so go ahead and tap on the date or time.
- A calendar will open up with a clock at the bottom.
- To adjust the date, simply tap the date. To adjust the time, tap on the clock at the bottom, and a scroll wheel should appear, allowing you to choose the time you want to set on your iPad.
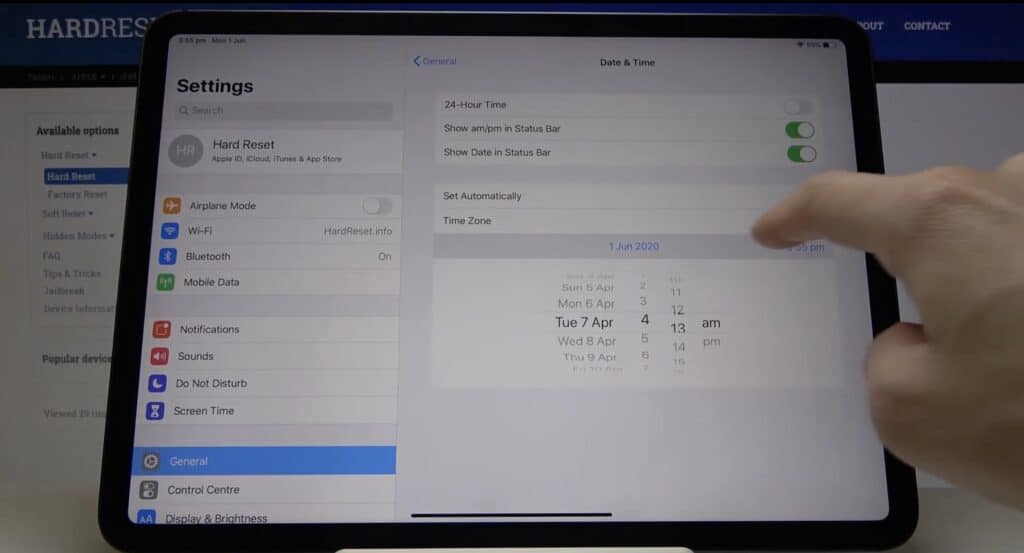
- You can set the hour, minute and choose between AM and PM here.
- To adjust by time zone instead of setting the time manually, let’s go back to step 5. Once you hit the toggle switch, you will see that the time zone option is now clickable. So go ahead and tap it.
- You get a search box where you can search for the city you’re in (or the city that you want to set the iPad time to).
- Choose the city, and you’re good to go! The time on your clock will update automatically.
And that’s how you set the time on your iPad! Make sure you choose AM/PM properly when you set the time, or it can mess with the alarms, reminders, and other notifications that you may have lined up for the day.
If you need video instructions, here is a video that shows you how it’s done:
Frequently Asked Questions
How do I manually change the time on my iPad?
To manually change the time on your iPad, open the Settings app, go to General, and then Date and Time. Here, you will see that “Set Automatically” is turned on. Tap the toggle switch, and then you should see an option to set the time and date manually. Tap on the time or date, and a scroll wheel will appear. You can now set the time.
How do I change my time settings?
To adjust time settings on your iPad, navigate to Settings > General > Date & Time. Here you have all settings related to time — you can choose between 12 and 24-hour formats, you can choose whether you want to see the date on your status bar, and you can also choose if you want to see AM/PM on the bar. You can also manually adjust the time here by toggling the ‘Set Automatically’ option. Switching it off brings up the date and time below, which you can then tap to adjust the time/date on your iPad.
Why is the time wrong on my new iPad?
It’s possible that your iPad is unable to synchronize correctly with Apple’s servers which makes it display the exact time. In such a situation, you should restart your iPad and also check if the operating system is updated. Also, make sure that your iPad sets the time automatically by toggling the “Check Automatically” switch, which can be found in Settings > General > Date & Time.
Conclusion
We hope our article above helped you understand how to change time on iPad! Like most things Apple does, it’s a really simple process, but maybe it could have been a bit more intuitive because people may not think of tapping ‘Set Automatically” to be able to see the manual adjusters for the date and time. If you have any more questions about similar things on your iPad, make sure you leave us a message so that we can get back to you!
Leave a Reply