If you’re an iPad user and have been stumped as to how to keep iPad screen on and prevent your device from automatically going into sleep mode, there’s no need to worry! With just a few simple settings adjustments, you can easily keep the display on without interruption.
How to Keep iPad Screen On
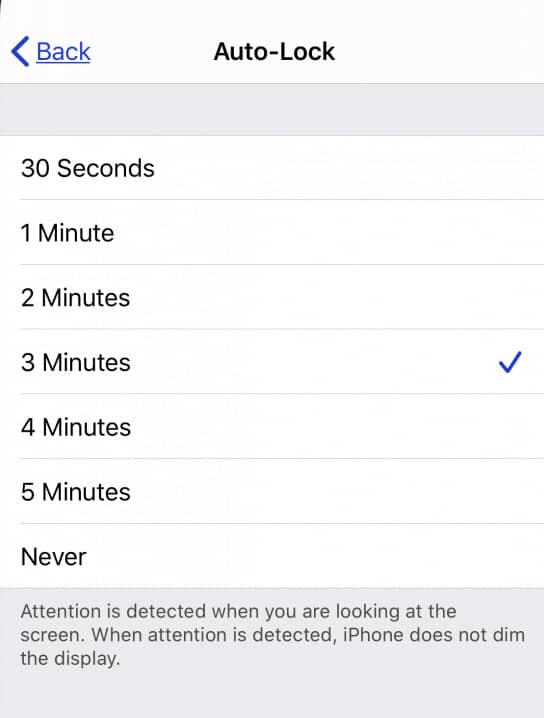
Wondering how to stop the iPad screen from going to sleep? It’s pretty simple to keep your iPad on. All you need to do is disable the automatic lock on your iPad. To disable the auto-lock, just go to your iPad Settings > Display & Brightness > Auto-Lock. Set Auto-Lock to “Never.”
Methods For Keeping Your iPad Screen On
For those who may not be aware, iPads automatically enter sleep mode and turn off the screen after a short period of inactivity. This is the standard setting as it helps to save battery life and enhance security by locking your device passcode while asleep.
While this feature is great, some users may find it to be inconvenient. This especially becomes an issue if you are reading something while working on other tasks such as cooking or reading; your iPad going to sleep can also be a nuisance in a situation where you are trying to present something on your iPad screen.
It is essential to be aware of the difference between automatic display sleeping and auto-brightness adjustments. You have the choice to disable or enable the auto-brightness feature in iOS, though keep in mind that its location within Settings changed with iOS 11’s update. When it comes down to it, this setting can make a drastic impact on your user experience!
Nevertheless, we have compiled a list of handy methods that you can use to keep your iPad from going to sleep.
Adjust Display & Brightness Settings
To keep your iPad screen from dimming and locking, you need to first adjust the display and brightness settings. It’s easy! Just follow these simple instructions to turn off auto-lock or set a timer for it.
- On your iPad, Go to Settings > Display & Brightness.
- Now, enable Auto-Lock.

- With the option to customize your lock screen time, you can pick 2 minutes or 5 minutes or decide that “Never” is best suited for you. It means that the display will remain awake until your battery runs out or you manually lock it.
As you have probably guessed, there are legitimate safety and privacy issues to consider with the Never option. For example, if the iPad does not take a rest or automatically locks itself when inactive, anyone can easily access it while in an active state.
Therefore, it is your responsibility to turn off the display and protect it using a strong locking system whenever you’re done using it or handing the device control to someone else.
Finding a suitable balance between screen time and inactivity can often be quite difficult, but the 4 or 5-minute settings on an iPad provide users with just enough time to stay engaged without being away too long.
From reading content or showing a presentation, this setting is especially popular due to its ability to automatically turn itself off after 5 minutes of non-usage for both privacy and security purposes.
Use Guided Access
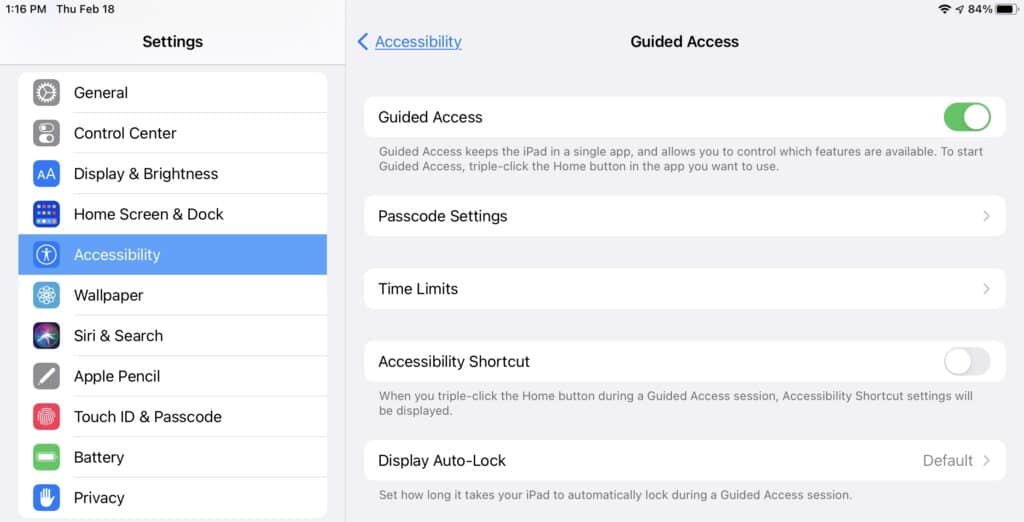
If you want to keep your iPad screen on for long periods, Guided Access is the perfect solution. This unique feature allows you to lock your iPad into a single app without risking any accidental exits or accesses. To activate this useful feature on your iPad, just follow the steps below.
- On your iPad, go to Settings > General > Accessibility.
- Now, tap on the “Guided Access” option and enable it. You also set a passcode for activating the feature.

- To access Guided Access mode, triple-click the Home button while using an app. Your iPad screen will now stay on until you end Guided Access.
Not only for keeping your screen on, but you can also use guided access to lock your iPad screen. This method is especially useful for parents who share their iPad with kids.
Disabling Automatic Updates
You might be wondering what automatic updates have to do with keeping your iPad awake. Automatic updates can, in some scenarios, restart your iPad. To avoid this, it’s best that you go ahead and disable the feature so that your iPad stays on.
While there are numerous sources on the web which suggest turning off automatic updates for your iPad to prevent it from going into sleep mode, we don’t recommend disabling these software upgrades.
Keeping up-to-date with the latest version of your device’s operating system is paramount — not only does it guarantee better performance and reliability, but security patches included in new releases also keep you safe against potential digital threats.
Don’t forget, updating regularly ensures that pesky bugs don’t affect your user experience either!
Rather than switching off automated software updates, why not adjust the settings so that they are installed when you’re asleep or when your device is not in use?
However, if you do decide to go ahead and disable automatic updates, it’s a breeze — just follow the instructions below:
- On your iPad, go to Settings > General > Software Update.
- Now, disable the “Automatic Updates” option.
As you do this, we once again would like to remind you that leaving your Automatic Updates enabled ensures it remains secure and up-to-date!
How to Fix a Grayed-Out Auto-Lock on Your iPhone
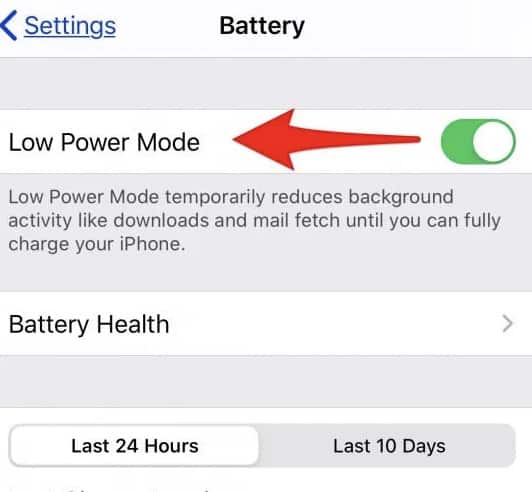
When your iPhone is in Low Power Mode, Auto-Lock will be unavailable. This function keeps the device from expending extra battery life by locking after 30 seconds of no activity. But don’t worry — you can quickly and easily disable this mode with one simple command to Siri: “Turn off Low Power Mode.”
Alternatively, you can also disable it manually. Once that’s done, just go back into Settings > Display & Brightness > Auto-Lock and choose a time limit that works for you.
Easily fix the grayed-out Auto-Lock setting with just a few steps given below:
- On your iPad, open the Settings app.
- Tap Battery.

- Turn off Low Power Mode. It will turn Gray once disabled.
Can Always-on Display Settings on iPads cause Screen Burn-in?
Have you ever wondered if it’s okay to leave your iPhone or iPad on for an extended period of time? We’re all familiar with the old CRT monitors that used to get “screen burn-in,” but what many don’t realize is this can still be a problem when using modern display technology.
Screen burn-in occurs when an image is left up on the screen for too long, leaving a residual impression of that image even once it has been replaced. Depending on your type of display, this effect can be permanent or temporary.
LCDs (Liquid Crystal Displays) are rarely susceptible to irreversible burn-in, seen in Apple laptops, iPads, and older iPhones. Nevertheless, these LCDs feature IPS (In-Plane Switching) technology which can cause fleeting image retention or ghosting – otherwise known as temporary burn-in.
This technology helps LCD screens remain less susceptible to this issue than other types of displays; however, even with these measures in place, most users need not worry about temporary burn-in.
If you own an iPad or iPhone with a liquid crystal display (LCD), leaving the same app displayed for prolonged periods shouldn’t be cause for concern. Even if you experience signs such as burn-in and image retention, these should quickly dissipate within minutes.
Through the Super Retina OLED display, Apple has implemented numerous software precautions to prevent burn-in on its iPad and iPhone devices. The subtle shift of the image on an OLED screen by one or two pixels alters most of the pixels within the display. This strategy is so seamless that it cannot be detected by human eyes.
Frequently Asked Questions
Now that you know all the ways to keep the iPad from going to sleep, let’s tackle some other related questions too.
Why does my iPad turn off so quickly?
Your iPad is most likely turning off quickly because you have chosen the shortest time in the Auto-lock settings. To adjust this setting, so your iPad doesn’t automatically turn off, go to Settings > Display & Brightness > Tap on Auto-Lock > Choose a longer duration.
How do I increase the time before my screen goes dark?
You can increase the time before my screen goes dark by going to Settings > Display & Brightness > Tap on Auto-Lock > Choosing a longer duration for the screen to lock. You can choose up to 5 minutes to keep your screen on and not automatically lock.
Conclusion
We hope that our guide assisted you in making your iPad’s screen last longer! As we previously mentioned, the most effective option is to choose the highest time duration instead of selecting “Never,” which could result in exorbitant battery consumption and pose potential safety risks. What method will you use for keeping your iPad screen on? Feel free to let us know in the comments!

Leave a Reply